How to Build and Deploy an ERC-721 Token Smart Contract on Binance Smart Chain

I am a full-stack developer experienced in both frontend and backend technologies.
I enjoy learning new tools, building, tinkering with codebases, and sharing what I learn with the developer community.
On the flip side, when I am not on my computer, I spend quite a lot of time reading books. My interests are very diverse. I would quickly jump to anything with a captivating blub.
Overview
Digital collectibles have been gaining popularity as an alternative to traditional asset ownership models, as they provide a secure way to store and transfer ownership of digital and physical items.
In this guide, you will learn how to easily build and deploy an ERC721 token smart contract on Binance Smart Chain(BSC). This guide will provide step-by-step instructions for uploading your NFT files on IPFS, and writing and deploying your smart contracts on BSC.
By the end of this guide, you will have a basic understanding of the development process and be well on your way to creating your own ERC-721 token smart contracts.
Let's get started!
What Is an NFT?💡
An NFT (non-fungible token) is a new form of digital asset that has gained traction in the blockchain and cryptocurrency world. They represent unique, one-of-a-kind assets such as unique pieces of digital art or other digital collections.
NFTs and tradable cryptocurrencies have some similarities such as they are created and stored on the blockchain, however, unlike cryptocurrencies, NFTs are not interchangeable and are not divisible; each NFT is unique and cannot be replicated. Additionally, each NFT represents a "token" that is issued to an owner. The owner can hold or trade the NFT on secondary markets.
What Is an NFT Standard?💡
NFT standards are technical specifications that define how digital assets are developed on a particular blockchain network. These standards ensure the interoperability and security of digital assets on a particular network.
NFT standards also enable developers to build digital assets with unique properties that make them valuable, such as rarity traits.
There are 2 common standards:
ERC-721.
ERC-1155 .
ERC-721 Standard
ERC stands for Ethereum Request for Comment, and 721 represents the proposal identifier number. ERC-721 is a non-fungible token (NFT) standard that defines a set of rules and standards that must be followed by any EVM-based blockchain such as BSC when writing NFT smart contracts. The standard specifies how developers create and manage unique digital assets.
The downside of this standard is that it doesn't support bulk NFT transfers in a single transaction. This issue is addressed by the ERC-1155 standard.
ERC-1155 Standard
ERC-1155 is a standard that specifies the creation, mass issuance, and management of multiple tokens on EVM-based blockchains such as BSC.
It supports the creation of fungible and non-fungible tokens and provides an efficient way to perform bulk token transfers within a single transaction.
Getting Started With Binance Smart Chain👨💻
Binance Smart Chain (BSC) is an EVM-compatible blockchain that is connected to the Binance Chain and is powered by BNB tokens. It allows developers to build and deploy decentralized applications (dApps) and smart contracts on the network.

Comparison Between Binance Smart Chain and Ethereum💡
Binance Smart Chain and Ethereum are both popular blockchains for deploying NFT smart contracts. Both offer secure, decentralized platforms for creating and managing digital assets.
Binance Smart Chain offers low-cost, high transaction speeds, and a high-performance solution for NFTs. Binance Smart Chain does not have the same level of technical complexity as Ethereum, and transaction fees are much lower. This makes it ideal for creators and collectors who don’t want to spend a lot of money on transaction fees.
Ethereum is a pioneer and well-established blockchain platform for deploying NFTs. It is more complex than Binance Smart Chain and has higher transaction fees. Ethereum is the go-to platform for sophisticated and experienced NFT users who need extra security and features. Additionally, Ethereum has a much larger user base, which gives it more liquidity and makes it easier to find NFT traders.
In conclusion, both Binance Smart Chain and Ethereum are great platforms for deploying NFTs. Binance Smart Chain is ideal for creators and collectors who want a low-cost, high-performance solution, while Ethereum is the better choice for experienced users who need more features.
Ultimately, the best platform for deploying NFTs will depend on your needs and preferences.
Write and Deploy the ERC-721 Smart Contract on Binance Smart Chain Testnet
Binance Smart Chain has two networks used in the development of WEB3 applications:
Mainnet
A mainnet is the core blockchain protocol that connects the different nodes within the network. The mainnet facilitates the recording, validation, and storage of transactions on-chain.
Testnet
A testnet is a blockchain network that allows developers to test new features and applications with real-world scenarios, without having to use real tokens, hence the need for test BNBs. Testnets are usually a replica of the main blockchain network, but with different features set up for testing purposes.
Step 1: Get Test BNB Tokens
You will need some test BNB tokens to pay for gas fees for the smart chain testnet. The gas fees are used to pay for the cost of executing transactions on the Binance Smart Chain (BSC) testnet. Transactions include transferring tokens, deploying smart contracts, and interacting with smart contracts. To learn more about gas fees, you can review this article.
The test BNB tokens will allow you to deploy the smart contract on the testnet without using real funds.
To obtain test BNB tokens:
📌Step 1: Add Binance Smart chain testnet on your Metamask wallet.
Open your Metamask wallet extension on your browser. You can download it from Chrome's extension store if you don't have it installed.
Click on the network display tab on top and then click on
Add networkbutton.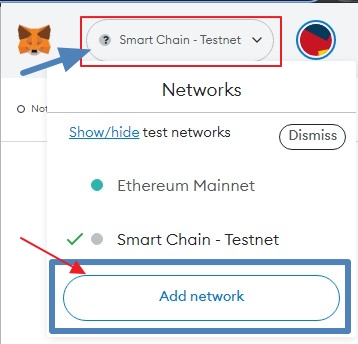
In the settings page that opens up, click on
add a network manually.
Next, enter the network details as follows:
Network Name: Smart Chain - Testnet
New RPC URL: https://data-seed-prebsc-1-s1.binance.org:8545
ChainID: 97
Symbol: tBNB
Block Explorer URL: https://testnet.bscscan.com
Click on
saveto add the network.
📌Step 2: Get test BNB tokens.
Copy your wallet address and navigate to BNB Smart Chain Faucet to obtain the test BNB tokes.
Paste in your wallet address in the input field and click on give me BNBbutton to receive your test BNB tokens.

On your Metamask wallet, check to see that some test BNB tokens have been added.

Once you have your test BNB tokens you can proceed to generate your NFTs.
Step 2: Generate Your NFTs
There are a number of ways of creating/generating NFTs. For this tutorial, we will use HashLips Art Engine -- an open-source tool used to create multiple NFT images based on the NFT layers you provide. In addition, it allows you to generate the NFT's metadata JSON files with only a few lines of code.
📌Step 1: Clone HashLips project folder in your local development machine.
Visit HashLips Art Engine GitHub Repository and copy the repo's GitHub URL.
Create a new project folder. Now, open the project's folder in your code editor's terminal and run the command below:
git clone https://github.com/HashLips/hashlips_art_engine
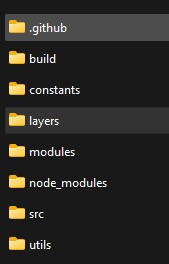
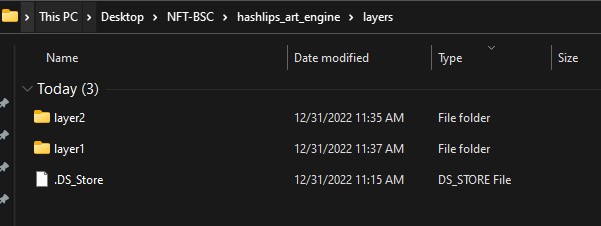
Once the repository has been cloned, open the Engine's folder on your code editor. Alternatively, you can download the Engine's repository zip file. Once the download is done, extract the project folder from the zip file and finally open the project's folder on your code editor. The folder structure should look like this:

📌Step 2: Configure HashLips Art Engine to generate your NFTs.
First, run this command to install the node dependencies for this project:
npm install
Next, navigate to your /src directory and open the config.js file. This file contains the code that defines the NFTs' metadata and the NFTs' properties. We will make a few changes to this file to generate NFTs.
Now, make the following code changes on the config.js file.
Set the network.
Since, we will be deploying the NFT contracts to the BSC network, set the network variable to
NETWORK.bsc.const network = NETWORK.bsc;Define the Metadata information for your NFT collection.
  const namePrefix = " NFT collection Name";
  const description = "NFT description.";
  const baseUri = "ipfs:// IPFS images URI";
Configure the layers to be added to your NFT.
The
layerconfigurations arraycontains an object with the following properties:📌
growEditionSizeTo- The size of your NFT collection. Set the number of NFTs you want to be generated.📌
layersOrder- The order in which the NFT layers will be added to your NFT.const layerConfigurations = [ { growEditionSizeTo: 3, layersOrder: [ { name: "layer1" }, { name: "layer2" }, { name: "layer3" }, { name: "layer4" } ], }, ];Set the NFT background.
If you don't have a custom background layer for your NFTs, you can set the background property to
trueto generate it.const background = { generate: true, brightness: "80%", static: false, default: "#000000", };These are the main code changes. However, you can customize the properties further based on the requirements of your NFT project.
📌Step 3: Add the NFT layers.
To add the layer images that will make up the NFTs, open the HashLips Art Engine project's folder on your file explorer.
Next, open the layers directory. This folder will house the different layers that will make up your NFTs.
Finally, delete the template folders and create new ones, naming each folder to match a particular layer. The folder names should be similar to the layer names defined in the config.js file. In each layer folder created, add the images for that layer.
Run the command below to generate the NFTs:
node index.js
Once this is done, a new folder -- build will be created housing images and JSON folders with the NFTs and their metadata.

Step 3: Upload Your NFT Files on InterPlanetary File System (IPFS)
IPFS provides a secure and immutable platform to store the NFT files on-chain. It also makes it faster to access the NFT files and metadata since they can be accessed from multiple locations at once.
We will upload the NFTs on IPFS to obtain a Content Identifier (CID) -- a unique identifier or a cryptographic hash associated with a particular data item that can be used to verify the authenticity and ownership of the item.
What Is Filebase?💡
Filebase is an S3-compatible object file storage service that provides a secure and reliable way for users to store data across multiple decentralized storage networks.
Filebase web-based client provides a platform that allows you to easily upload, store and access files on the IPFS network hustle-free.
Upload the NFT Images Folder on Filebase
📌Step 1: Sign up for a free Filebase account.
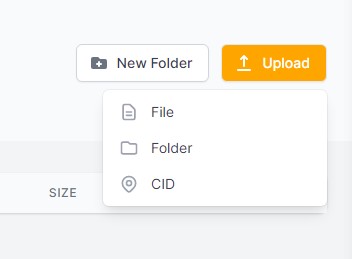
📌Step 2: On your dashboard pane, click on the
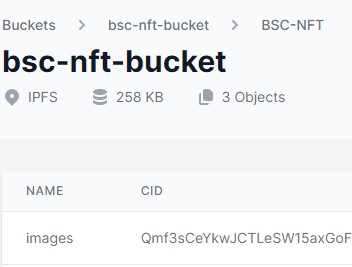
buckettab. The bucket will house all the images and JSON folders.
📌 Step 3: Create a new bucket and in it, create a new folder.
📌Step 4: In the new folder created, upload the images folder.
📌Step 5: Copy the CID hash generated. You will add the CID as part of the NFT metadata in the JSON files. This is necessary since the CID identifies the NFT stored in the IPFS network.
Upload the NFT JSON Folder on Filebase
- 📌 Step 1: Go back to your code editor, and open the
config.jsfile. Update thebase URImetadata with the CID hash you have just copied.
The format should look like this:
const baseUri = "ipfs://Your CID";
- 📌Step 2: Run this command to update the property on the metadata of all JSON files.
npm run update_info
📌Step 3: Upload the JSON folder on Firebase.
📌Step 4: Copy the JSON folder CID. You will use it to set the Base URI for the smart contract.
Step 4: Write the ERC-721 NFT Smart Contract
For simplicity and security, we will use OpenZepplin's contract wizard to generate the ERC-721 smart contract. OpenZepplin provides a library of reusable and secure smart contracts for EVM (Ethereum Virtual Machines) based blockchains.
To use OpenZepplin's contract wizard:
Open OpenZepplin's contract wizard on your browser.
Select ERC-721 contract.
Provide the Name for your smart contract, its symbol, and the Base URI. The Base URI will be the IPFS Gateway URL for NFT images uploaded on IPFS via Firebase.
For this tutorial, I will set mintable as the only feature.

Click on the
Open in Remixbutton to view the smart contract on Remix -- a browser-based IDE for writing and deploying smart contracts.
The code should look like this:
// SPDX-License-Identifier: MIT
pragma solidity ^0.8.9;

import "@openzeppelin/contracts@4.8.0/token/ERC721/ERC721.sol";
import "@openzeppelin/contracts@4.8.0/access/Ownable.sol";
import "@openzeppelin/contracts@4.8.0/utils/Counters.sol";

contract MyToken is ERC721, Ownable {
    using Counters for Counters.Counter;

    Counters.Counter private _tokenIdCounter;

    constructor() ERC721("MyToken", "MTK") {}

    function _baseURI() internal pure override returns (string memory) {
     return "IPFS gateway URL "
    };

    function safeMint(address to) public onlyOwner {
        uint256 tokenId = _tokenIdCounter.current();
        _tokenIdCounter.increment();
        _safeMint(to, tokenId);
    }
}
Let's break it down:
Line 1 - Specifies the software license.
Line 2: Specifies the version of solidity the contract will be compiled in.
We import 3 modules from OpenZepplin's library:
ERC721.sol,Ownable.sol, andCounters.sol.A new contract called "MyToken" based on the ERC721 token standard which inherits from the Ownable and Counters contract modules is created.
The constructor sets the parameters of the token to "MyToken" and "MTK".
The
safeMintfunction is used to mint new tokens and assign them to a given address. It does this by first getting thecurrent token IDfrom theCounterscontract then increments thecounter, and finally calls the_safeMintfunction with theaddressandtoken IDas parameters.
Step 6: Deploy the ERC-721 NFT Smart Contract on BSC Testnet
Follow the steps below to deploy the contract on the BSC testnet.
Set the compiler version.
Configure the compiler version on Remix IDE based on the solidity version specified on your smart contract code. Select the compiler version on your Remix IDE. For this tutorial, I will set the version
^0.8.9.
Compile the smart contract.

Once the contract has been compiled, move to the
run and deploysettings tab.
Select the network environment in which the contract will be deployed. For this case, select
Injected Provider - MetaMaskoption. This will be the BSC testnet you added earlier on your MetaMask wallet.
Click on
deploybutton to deploy the smart contract on the BSC testnet. Confirm the transaction on MetaMask to finalize the transaction.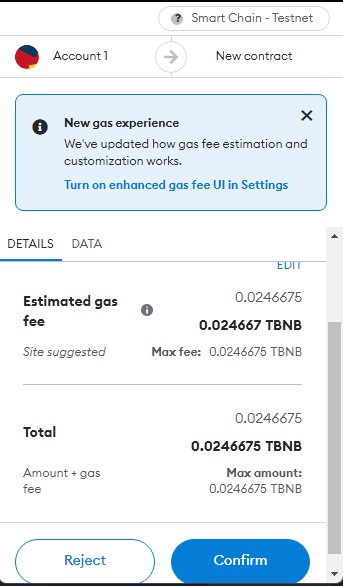
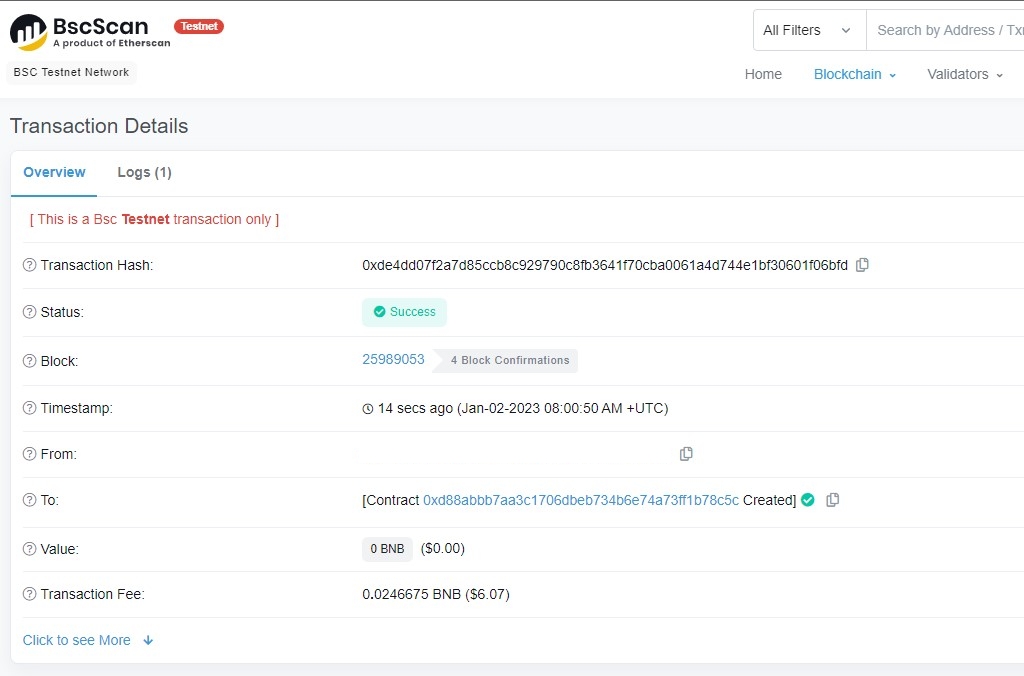
Copy and paste in your minting transaction hash on BscScan (make sure to select testnet) to view the transaction.
Bonus Tip: To deploy to the smart contract on BSC mainnet: Purchase BNB tokens, add the network on MetaMask, select the network as the deployment environment on Remix and then deploy.
Wrapping Up
Writing and deploying an ERC-721 smart contract on BSC is a relatively straightforward process, as long as you follow the steps outlined in this guide.
Once you have deployed your smart contract, you can set up an interface where users can access and interact with it. With the help of BSC, you can easily build decentralized applications and services that utilize ERC-721 tokens.


